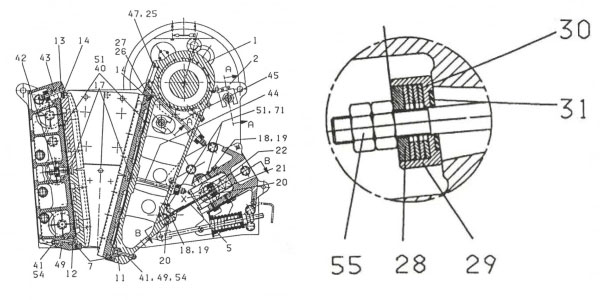
2 PIECE JAW DIE REPLACEMENT
Jaw dies can either be turned end for end or replaced depending on their wear. The jaw dies can be turned once after their installation before they need to be replaced.
Fixed Jaw Die
• Clean the jaw die lifting holes. Remove stones and sand from the jaws. Remove material packed between the jaw and side plates.
• Hold the jaw die up with a hoist and lifting hooks.
• Remove the upper hex nuts (55) and the spring packages.
• Remove T -head bolts (43), tightening wedge (13), and upper wedge (14). Be careful not to drop the jaw die as it may personal injury and cause damage to the crusher.
• Remove the lower hex nuts (55) and the spring packages.
• Lift out the upper jaw die.
• Remove T -head bolts (42) and tightening wedges (17).
• Lift out the lower jaw die.
Movable Jaw Die
• Clean the jaw die lifting holes. Remove stones and sand from the jaws. Remove material packed between the jaw and side plates.
• Hold the jaw die up with a hoist and lifting hooks.
• Remove the upper hex nuts (55) and the spring packages.
• Remove T-head bolts (44), tightening wedge (26), and upper wedge (14). Be careful not to drop the jaw and cause damage.
• Remove the lower nuts (55) and the spring packages.
• Lift out the upper jaw die.
• Remove T -head bolts (44) and tightening wedges (17).
• Lift out the lower jaw die.
Assembly
• Before re-assembly make sure that the support surfaces are clean. The jaw dies should be in continuous contact with the support surfaces.
• Replace or turn worn parts. If the ends of the jaws are distorted or bent, the original dimensions must be achieved by torch cutting before re-assembly.
Fixed Jaw Die
• Replace the lower jaw die. Replace the tightening wedge (17) and T-head bolt (42).
• Replace the spring packages
• Snug the lower T-head bolt with hex nut (55) lightly.
• Replace the upper jaw Die.
• Replace the upper wedge (14), tightening wedge (13) and T-head bolt (43).
• Replace the spring packages.
• Make sure that there is a clearance of 3/16″-5/16″ (5-8 mm) between the upper and lower jaw dies and that the tightening wedge (17) has not bottomed out.
• Tighten the spring packages using hex nut (55). The spring packages are properly compressed when the bottom of the Spring Washer Housing (29) is flush with the bottom of the Spring Retainer (28). Secure with a “double” nut (55).
• Check the tightening after 8 operating hours.
• Movable Jaw Die
• Replace the lower jaw Die.
• Replace the tightening wedge (17) and T -head bolt (44).
• Replace the spring packages.
• Snug the lower T-head bolt with hex nut (55) lightly.
• Replace the upper jaw die.
• Replace the upper wedge (14), tightening wedge (26) and T-head bolt (45).
• Replace the spring packages.
• Make sure that there is a clearance of 3/16″-5/16″ (5-8 mm) between the upper and lower jaw die and that the tightening wedge (17) has not bottomed out.
• Tighten the spring packages using hex nut (55). The spring packages are properly compressed when the bottom of the Spring Washer Housing (29) is flush with the bottom of the Spring Retainer (28). Secure with a “double” nut (55).
• Check the tightening after 8 operating hours.
NOTE! The tightening sequence:
First pre-tighten the lower bolts and adjust the clearance between the upper and lower jaw die 3/16″-5/16″ (5-8 mm). Tighten the upper bolts and then lower ones. If the tightening wedge has bottomed out and there is no clearance, torch cut a piece from the jaw dies.
After every jaw die change or rotation the crusher setting must be checked. The tension on the return rod spring must be checked and adjusted if necessary. Refer to dimension “L” in the table Length of Spring.

